
QuickBooks connects to incentX via an ERP Utility; click “Download incentX Utility for QuickBooks” to download and install.
Step 1: External System Configuration Within incentX
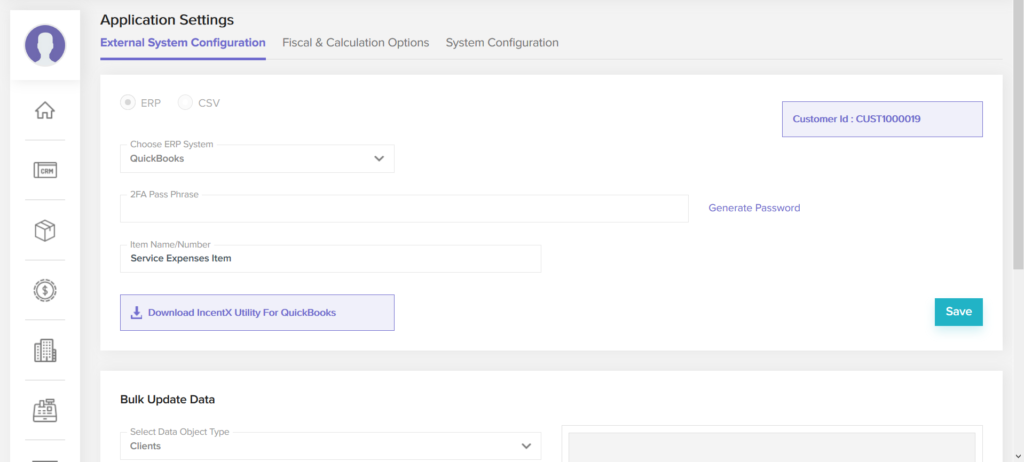
- 2FA Pass Phrase – this is a pass phrase which the ERP Utility will use to connect to incentX. You can enter any pass phrase you like, but we highly recommend you click “Generate Password” and use the secure pass phrase which is generated. Do not use the same pass phrase you use for your incentX account or any other account.
- Item Name/Number – enter an Item Name/Number from QuickBooks; incentX will use this item for generating bills to pay commission & rebate contracts. You can enter this later, but incentX will not be able to send invoices to QuickBooks until you fill it in.
Note the Customer ID in the top right corner of the External System Configuration screen; you will need this number to
install the ERP Utility (Step 3 below).
Step 2: Fiscal & Calculation Options
Configure your Data Start Date in Fiscal & Calculation Options so that incentX knows which transactions to load when it first syncs data from QuickBooks.
Step 3: incentX ERP Utility For Quickbooks
Install the utility on a machine which has access to your QuickBooks file, and which you have easy access to to make sure it is on and the installed user is logged in. While the ERP Utility will start automatically on login, due to limitations of QuickBooks, the ERP Utility cannot run as a Windows Service and therefore will not start when the machine turns on before the user has logged in.
Make sure your installation of the ERP Utility will have access to your QuickBooks file. You may need to installand run the ERP Utility as Administrator, depending on your Windows system configuration.
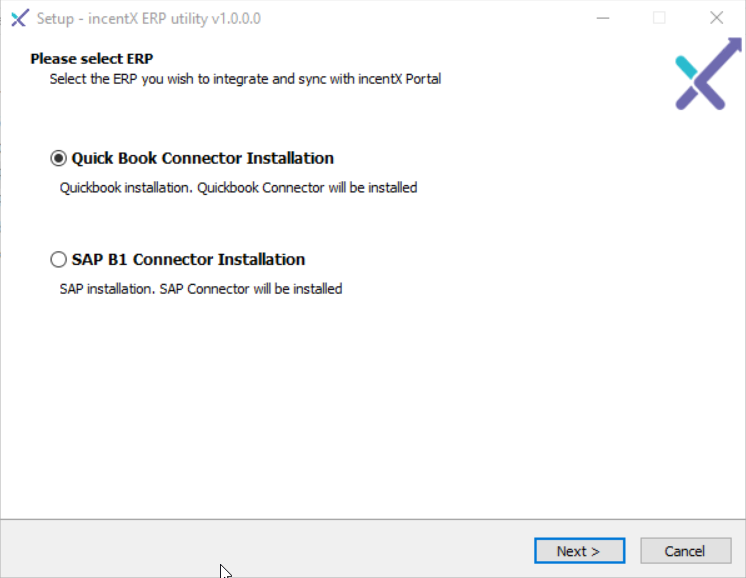
Launch the Setup program, and choose “QuickBooks Connector Installation”.
If you have not already installed the QuickBooks SDK, the installer will prompt you to install it. Finish the SDK installation and the installer will continue with the ERP Utility installation.
Once you have installed the ERP Utility, start QuickBooks and open your Company file. Leave QuickBooks running while you configure the ERP Connector for the first time.
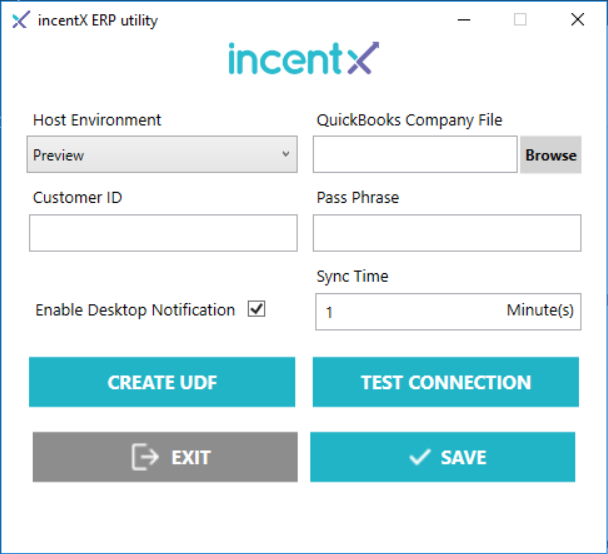
Start the ERP Utility and enter the following:
- Host Environment – Most users will choose App. If you are connecting the ERP Utility to a sandbox/test environment, choose Preview
- Company File – Choose your QuickBooks company file
- Customer ID – Your incentX customer ID, from the External System Configuration screen in incentX (see Step 1). Your customer ID also appears in the “Welcome to incentX” email you received
- Pass Phrase – The Pass Phrase you entered in the incentX External System Configuration screen
- Desktop Notification – Choose this option to be notified when the ERP Utility starts/finishes an update cycle
- Sync Time – How often the ERP Utility will sync with incentX. A smaller value will keep incentX more perfectly up-to-date but may generate some load on QuickBooks, though the individual update cycles will finish more quickly
Click “Test Connection” and make sure the ERP Utility successfully connects to incentX. If it doesn’t, re-check your
Customer ID and Pass Phrase.
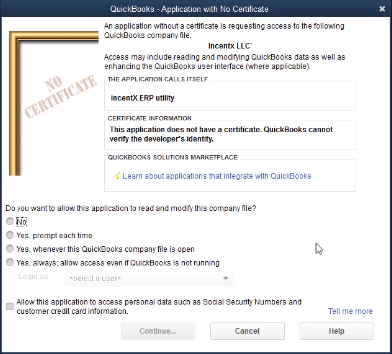
Go back to your open QuickBooks window; you will have to grant the ERP Utility permission permission to access QuickBooks. Make sure to enable access even when QuickBooks is not running. You may have to enter a QuickBooks username and password.
Click “Create UDF”; this will create user defined fields for incentX in QuickBooks, to tell incentX which Vendors to load from QuickBooks. (If you do not do this step now, you can always do it later).
Click “Save” to save your configuration. Now you can minimize the ERP Utility. The ERP Utility will continue to sync data between QuickBooks and incentX at whatever frequency you have set.
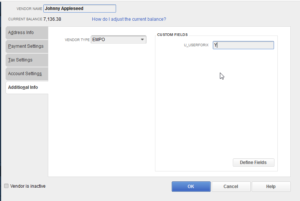
In order for incentX to load Vendors from QuickBooks (to receive payments from any kind of incentive contracts), you must first mark them as relevant to incentX. For each Vendor in QuickBooks, go to the “Additional Info” tab and set the U_USERFORIX custom field from N to Y.
